Deploy A Website using Code Pipeline, Cloudfront, and S3
Overview
Introduction
| POC Name | Hosting a Static website with S3 and cloud front |
|---|---|
| Catogory | Storage, Networking and Security |
| Youtube Video Link | not applicable at this time |
| Terraform code download | not applicable at this time |
Poc Description
In this proof of concept (POC), I will demonstrate how to use the Hugo web framework to deploy a static website to Amazon S3 and serve the content via CloudFront. This setup will also include a CI/CD pipeline using AWS CodePipeline to automatically build and deploy the website whenever new content is pushed to GitHub. This approach enables continuous updates, allowing new content to be delivered quickly and efficiently.
The goal is to simplify the deployment of website updates, ensuring that changes can be made with minimal manual intervention. My primary focus will be on the AWS components rather than the Hugo static site generator itself, as I am still relatively new to using Hugo for content and website creation. However, the techniques outlined here can be adapted for use with other static content frameworks, such as Django or Node.js. To accommodate these alternatives, you would only need to adjust the buildspec.yml file in the CodeBuild configuration to match the appropriate build process for those systems.
So, what AWS services will we be using?
-
S3 for content hosting
-
Cloud Front for content delivery
-
Amazon Certificate manager
-
AWS SNS
-
AWS code pipeline
-
AWS code build
-
AWS code deploy
-
AWS route53
By using this method, we also gain the added benefit of incorporating security features into our POC. This is because CloudFront provides a secure way to connect to the S3 bucket that hosts the website.
As shown below, I have included the technical diagram for this POC to help you visualize how it works.
POC Technical Diagram

Walk Through
Okay lets get to the actual work of building out this poc.
Hugo Website Creation Guide
Install Hugo
- Download and install the Hugo static site generator from the official Hugo website.
- After installation, confirm Hugo is working by running the following in your terminal:
hugo version
Create a New Hugo Website
- In your terminal, navigate to the folder where you want to create your Hugo site.
- Run the following command to create a new site:
Replacehugo new site <site-name><site-name>with your desired project name.
Add a Theme
- Navigate into your site’s directory:
cd <site-name> - Find a theme you like from the Hugo Themes site.
- To add the theme, run the following command (replace
<theme-name>with the theme you selected):git init git submodule add https://github.com/<author>/<theme-name> themes/<theme-name> - Add the theme to your site’s configuration by editing
config.toml:theme = "<theme-name>"
Create Content
- To create a new page or post, use the following command:
For example, to create a new blog post:hugo new <section>/<file-name>.mdhugo new posts/my-first-post.md - Open the generated
.mdfile in a text editor and add content in Markdown format.
Configure the Site
- Open the
config.tomlfile and modify settings like:- title: Your site’s title.
- baseURL: The base URL of your website (e.g.,
http://example.com/orhttp://localhost:1313/for local development). - languageCode: Set your site’s language (default is
en-us).
Build and Preview the Site
- To preview your site locally, run:
hugo server - Visit
http://localhost:1313/in your web browser to see the site in action.
Publish the Site
- Once you’re satisfied with the site, you can build it for production:
hugo - The site will be generated in the
public/directory.
Deploy the Site
- Upload the contents of the
public/directory to your web server or hosting provider. - For example, you can deploy it to an S3 bucket, a VPS, or use a service like Netlify or GitHub Pages.
This guide provides a quick overview of setting up a new Hugo website, from installation to deployment.
Create web hosting bucket
The first step is to set up an S3 bucket for web hosting. This is one of the simpler tasks to complete. From the AWS Management Console, type “S3” into the search bar, and it should appear in the results.

Click on the “S3” option to navigate to the S3 service page. Once the page loads, you’ll see a list of any existing buckets, as shown in the screenshot below. From here, click the “Create bucket” button to begin setting up a new bucket.

After clicking on this you will come to the create bucket page as shown below.
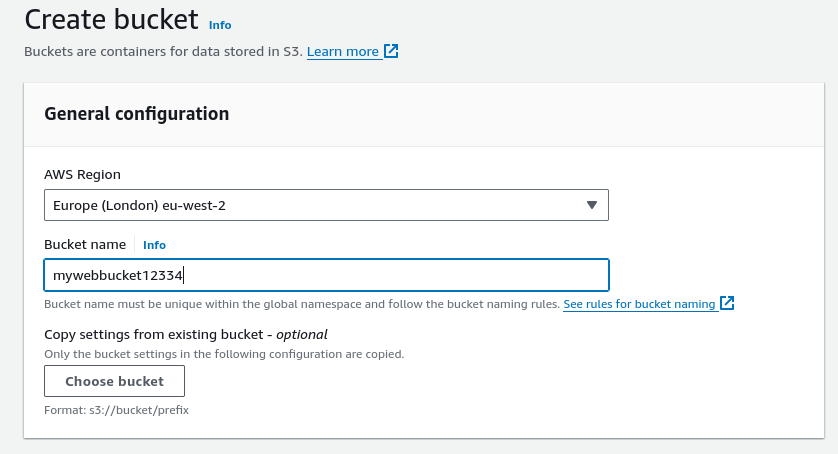
From here, you’ll need to select a region for your S3 bucket. Next, enter a unique name for your bucket. This name must be globally unique—not just within your AWS account, but across the entire AWS ecosystem. If you own a registered domain, I recommend using it as your bucket name. Once completed, the form should resemble the example shown in the screenshot above.
Next, scroll down the page, leaving all other settings at their default values, until you reach the sections shown below.
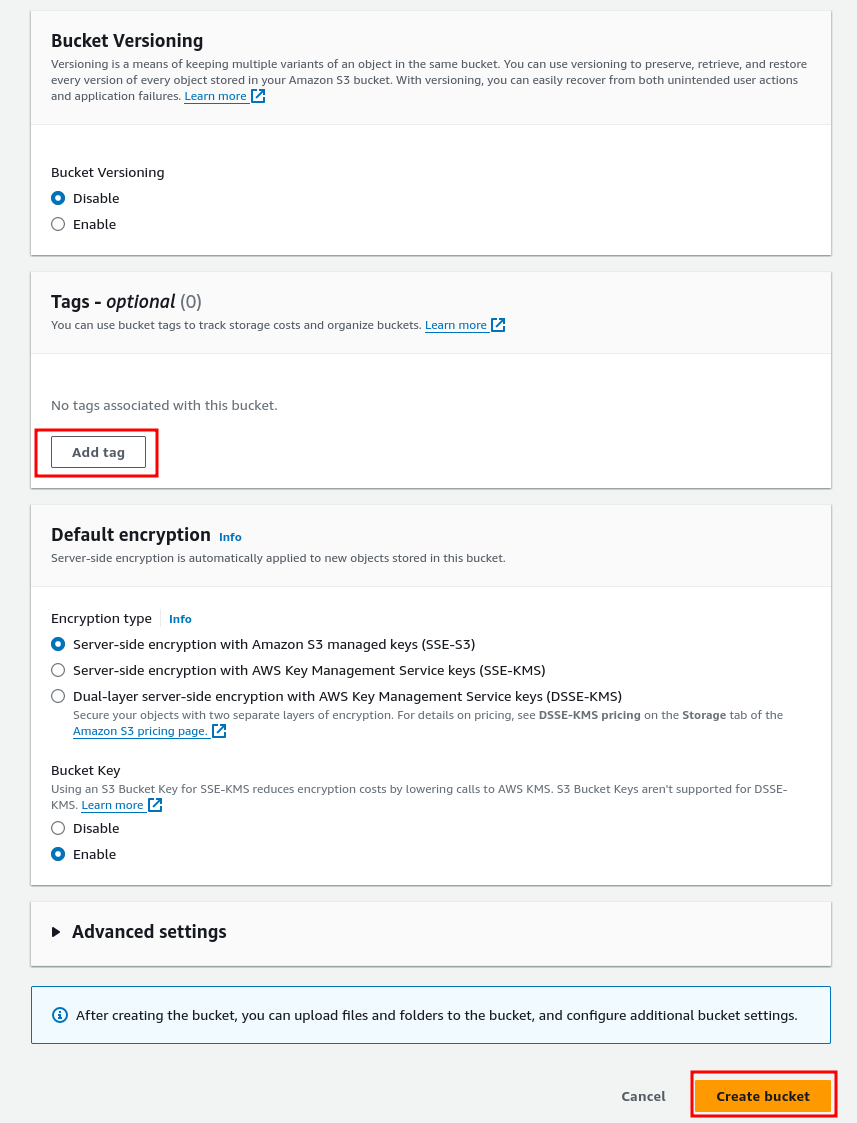
As you can see, I have left versioning set to the default option of “No” because I don’t need to revert to an older version of the document. However, if you wish to easily revert to a previous version of a particular page, select “Yes” for this option.
Next, add any tags you wish to use, but I personally recommend the following three:
- Name
- Description
- Environment
- This will make it easier to trace your resources within your environment.
The next step is to choose the type of encryption for your bucket. Previously, it was possible to leave encryption disabled, but AWS has since removed that option to enforce a higher level of security. This change was implemented because users would occasionally forget to enable encryption, potentially uploading sensitive data without proper protection at rest. For this setup, I’m using standard SSE (Server-Side Encryption) with AWS-managed keys.
Once you’ve configured these settings, simply click the Create bucket button. That’s all you need to do for now. However, we’ll return later to update the bucket policy in order to allow CloudFront to access the bucket.
Create Pipeline Failure SNS topic.
Next, we will create an SNS topic that will send an email to the developer if the pipeline fails. This is a simple feature to implement. The first step is to search for the SNS service in the AWS console.

Once we click on SNS, we will be taken to the SNS service page. If you don’t have any SNS topics set up already, it should look like this.

Now enter a name for your topic and click on next step. When the page opens you will see something like this.
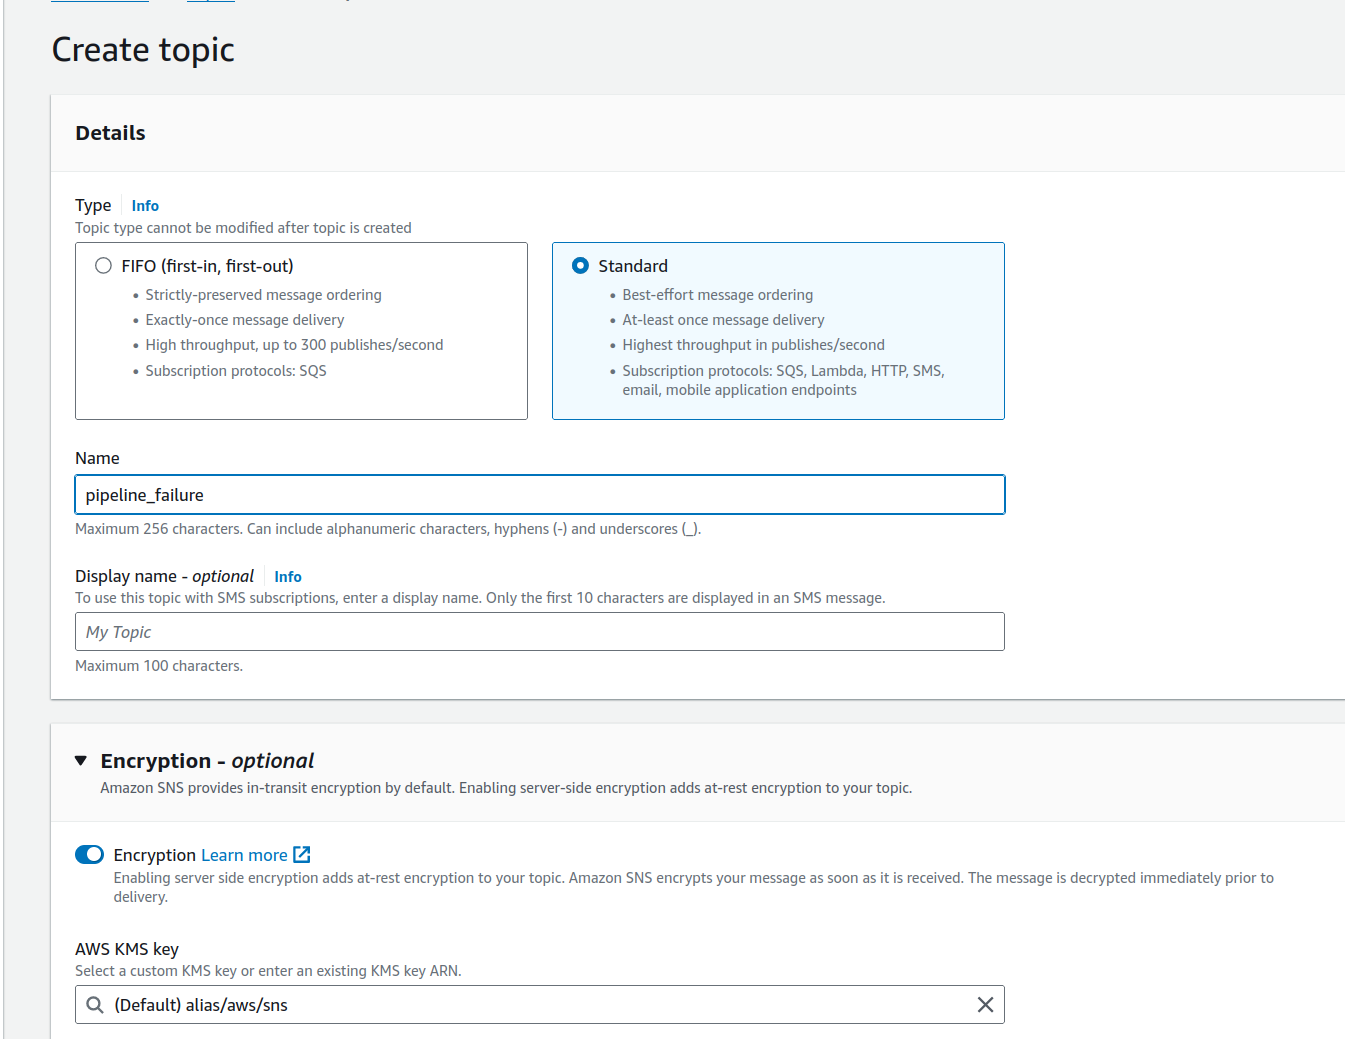
When you open the page, you’ll notice that encryption is not selected by default. Be sure to select this option to ensure your notifications are encrypted within AWS. Leave the setting at its default unless you prefer to provide your own encryption key.
Once again, scroll down to the bottom of the page where you’ll see the options displayed in the screenshot.

Again enter tags as per S3 and then click on the create topic button. Once done you will now be redirected to this page.
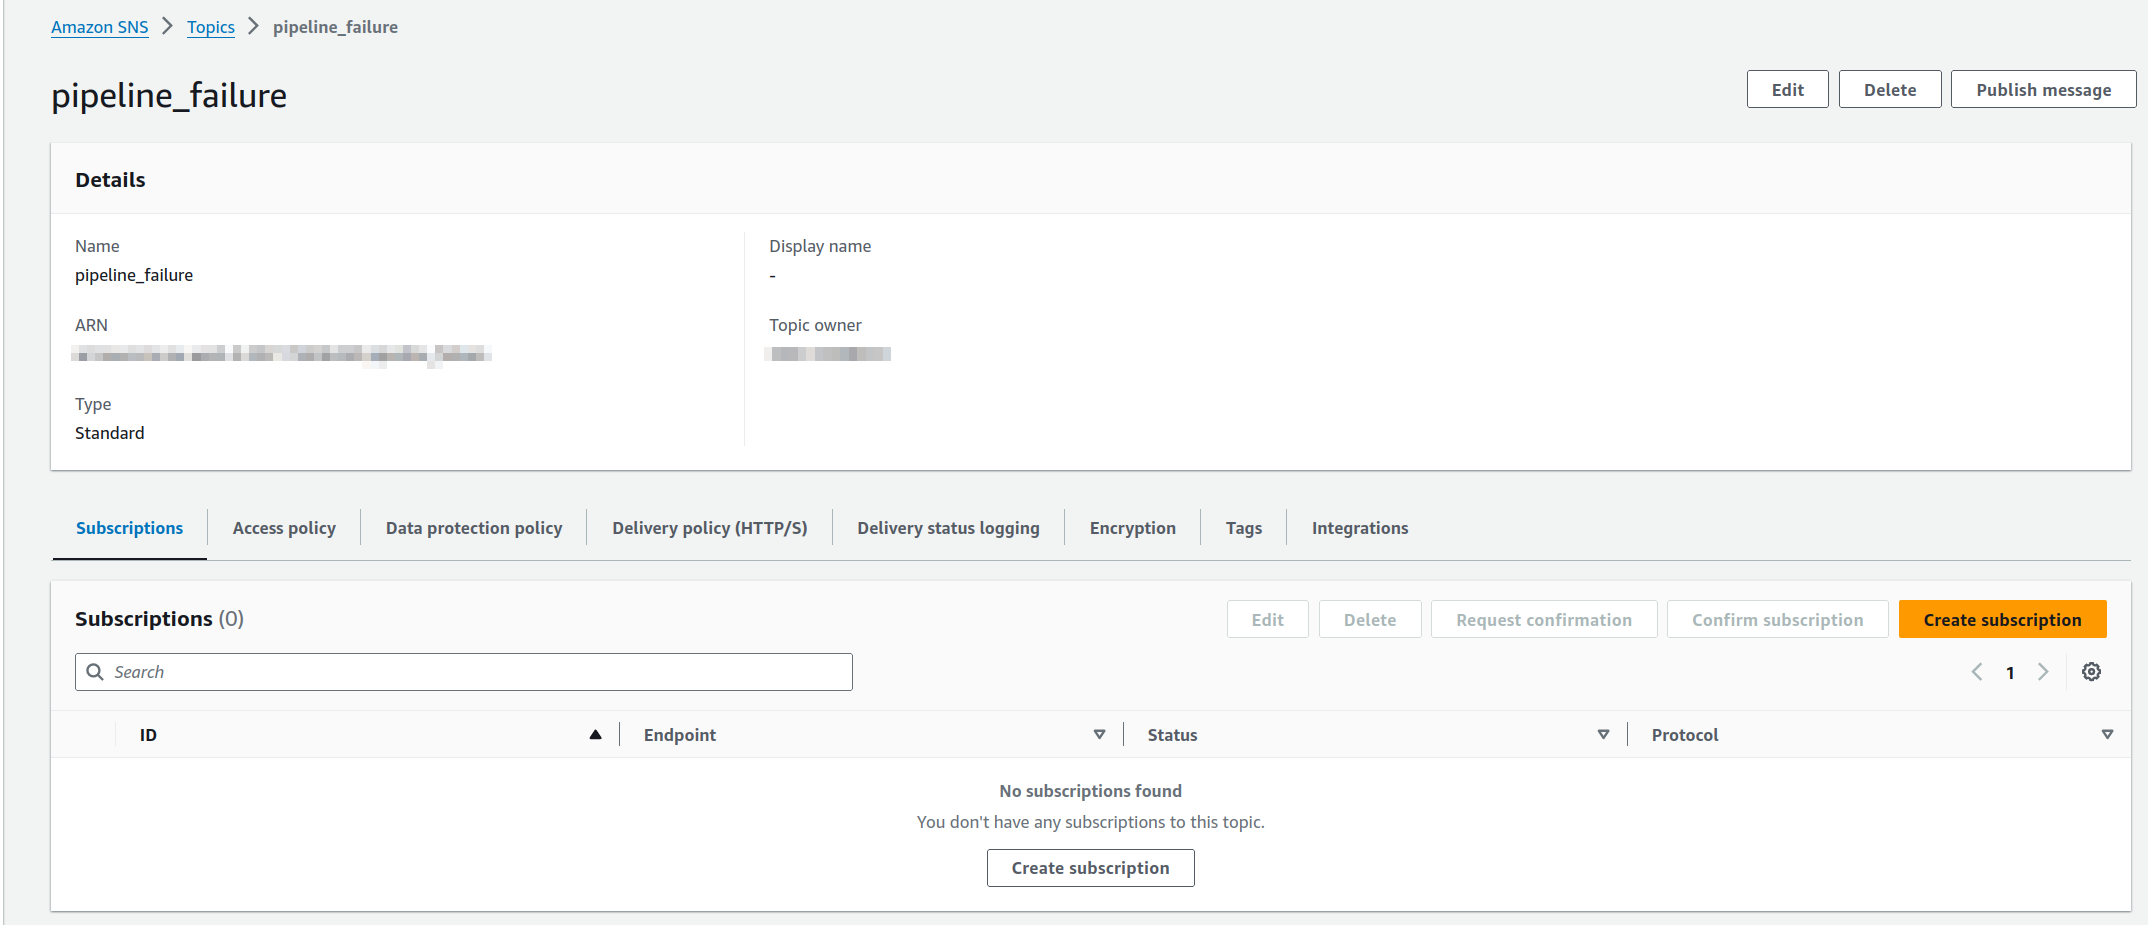
The next step is to create a subscription for this. Click on the “Create subscription” button. From the protocol dropdown, select the “Email” option, and then enter the email address of the person who should receive the notification. Once done, you should see something like this.
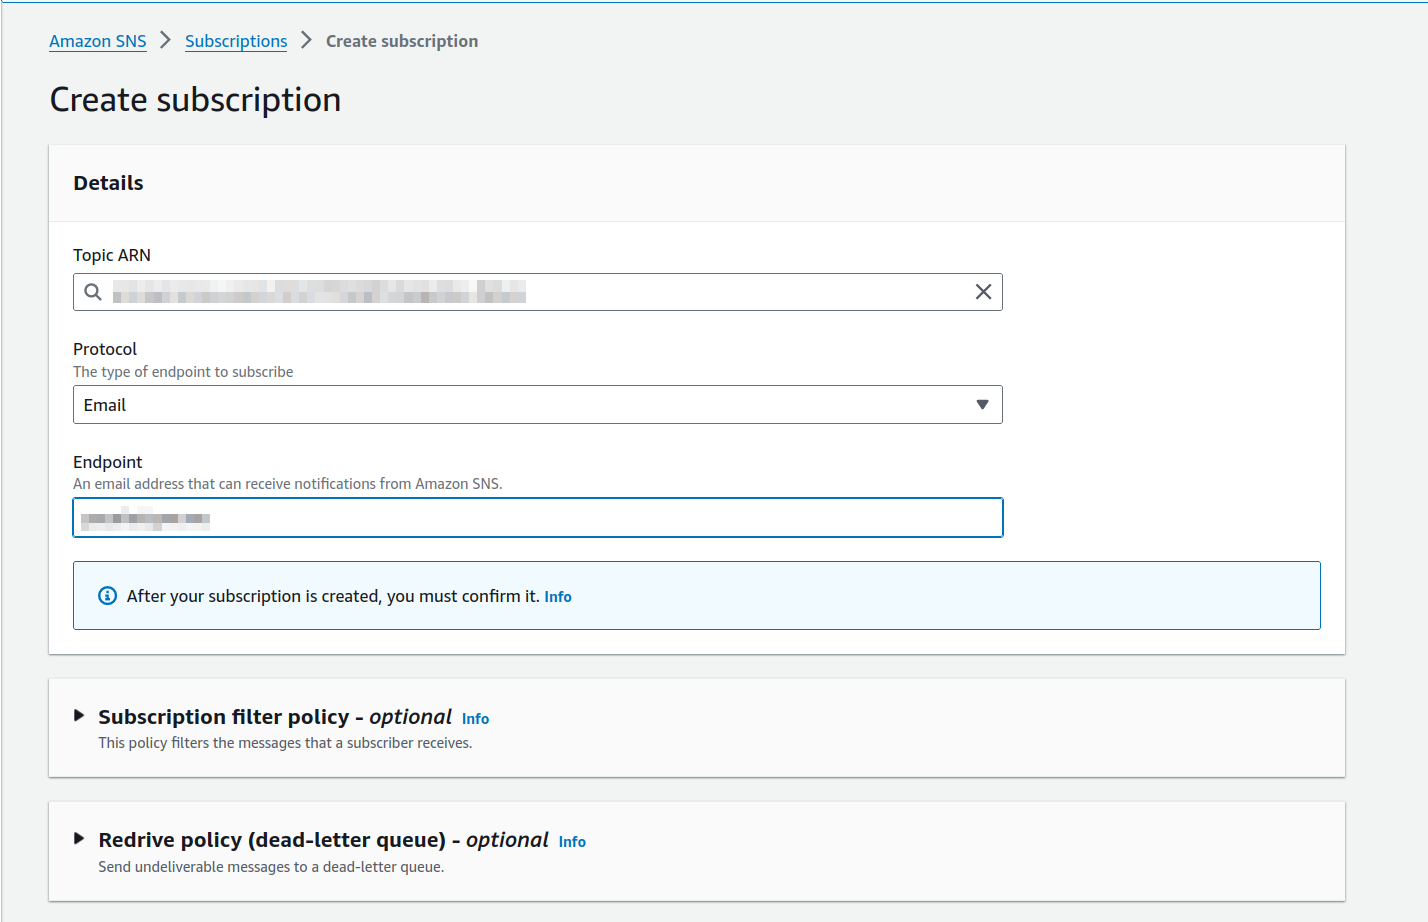
When done click on the create subscription button at the bottom. This will return you to the previous screen and it will look like this.

You will notice that it says “Pending confirmation.” This is because an email will be sent to the address you entered to confirm the subscription. Check the email account and click the link in that email. Once that’s done, you will start receiving emails if the pipeline fails.
Create code build project to build the site.
The first thing we need to do is go to the CodeBuild service in the AWS console. You can find this by searching in the main console page. Once you’ve done this, a page like the one below should appear.

From here we need to click on the create build project which will then bring you to this page.
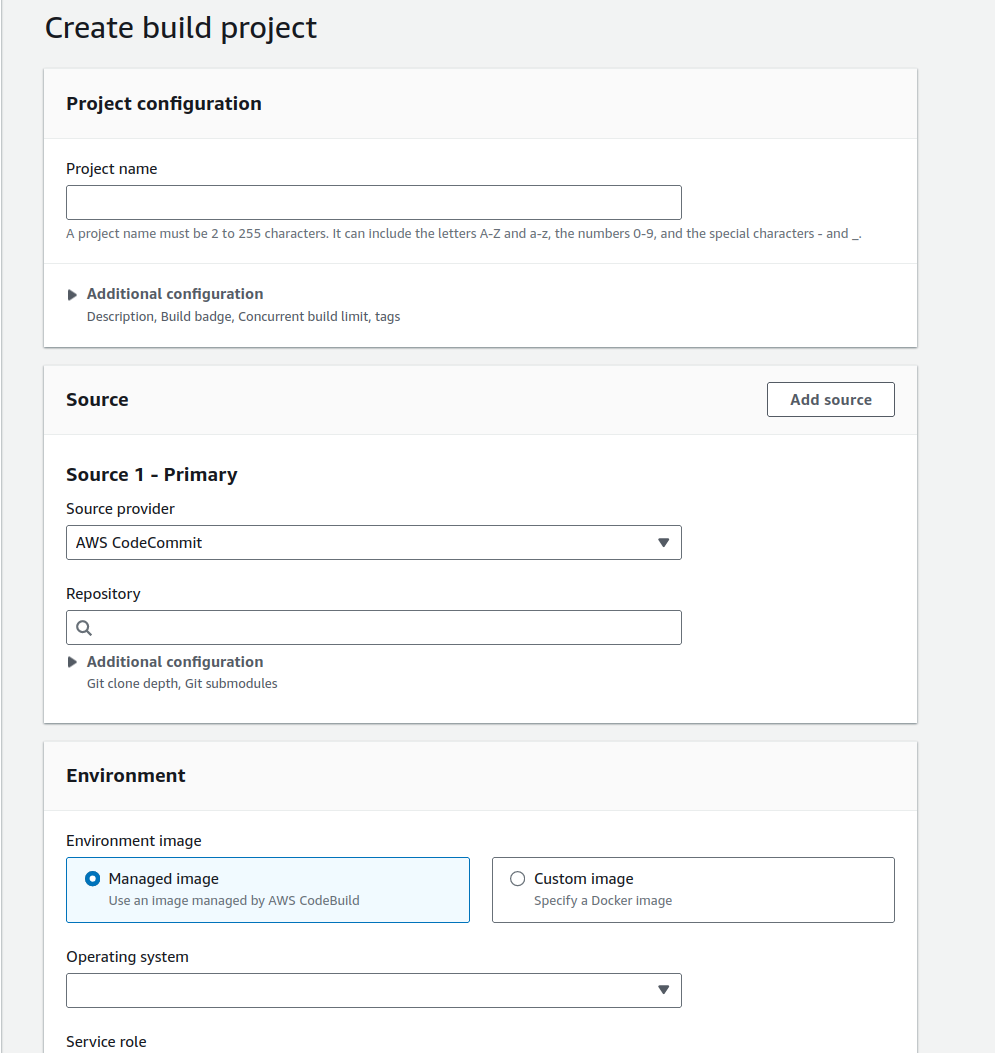
First, fill out the name for your project. Next, choose the source from the dropdown menu, which in this case will be CodePipeline. For the environment image, leave it set to “Managed image,” and from the dropdown menu for the operating system, select “Ubuntu.” Once you do this, you will see the options that appear. Choose the same options as shown in the screenshot.
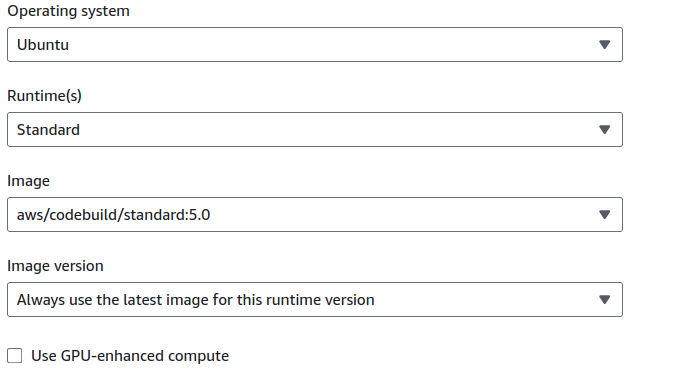
Once these setting are applied, scroll down a bit further and you will see the next settings we need to modify.
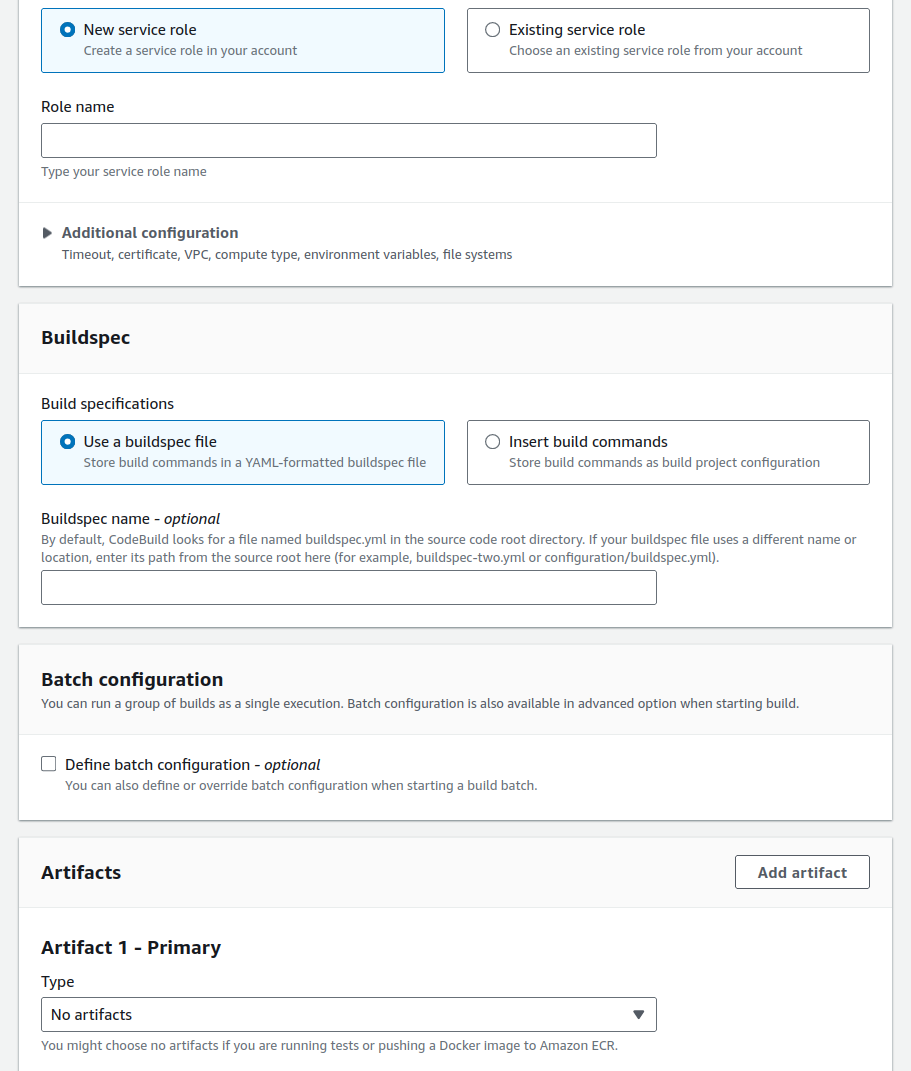
For the service role, choose “Create a new service role” and give it a name. In the buildspec section, select the option to “Insert build commands.” A button will then appear saying “Switch to editor.” Click on that button, and the editor will appear.
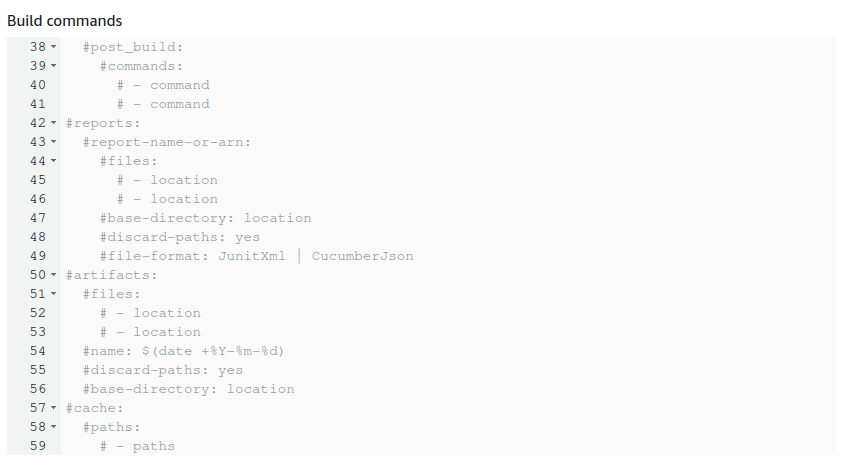
Remove all the text that appears in that box and use the example code below to replace it.
Buildspec example
version: 0.2


phases:
  install:
    runtime-versions:
      python: 3.8
    commands:
      - apt-get update
      - echo Installing hugo
      - curl -L -o hugo.deb https://github.com/gohugoio/hugo/releases/download/v0.139.4/hugo_extended_0.139.4_linux-amd64.deb
      - dpkg -i hugo.deb
      - dpkg -i hugo.deb


 # pre_build:
#    commands:


  build:
    commands:
      - ls
      - hugo

  post_build:
    commands:
      - ls
      - rm -rf .hugo_build.lock hugo.deb .git .gitignore content archtypes theme layouts static resources *.md *.toml *.save
      - pwd
      - cp -r public/* .
      - rm -rf public
      - mv post/index.html post/archive.html
      - mv post/index.xml post/archive.xml
      - ls post/
artifacts:
  files:
    - '**/*/'
Once this is done scroll down a bit further and you will reach the last couple of sections.
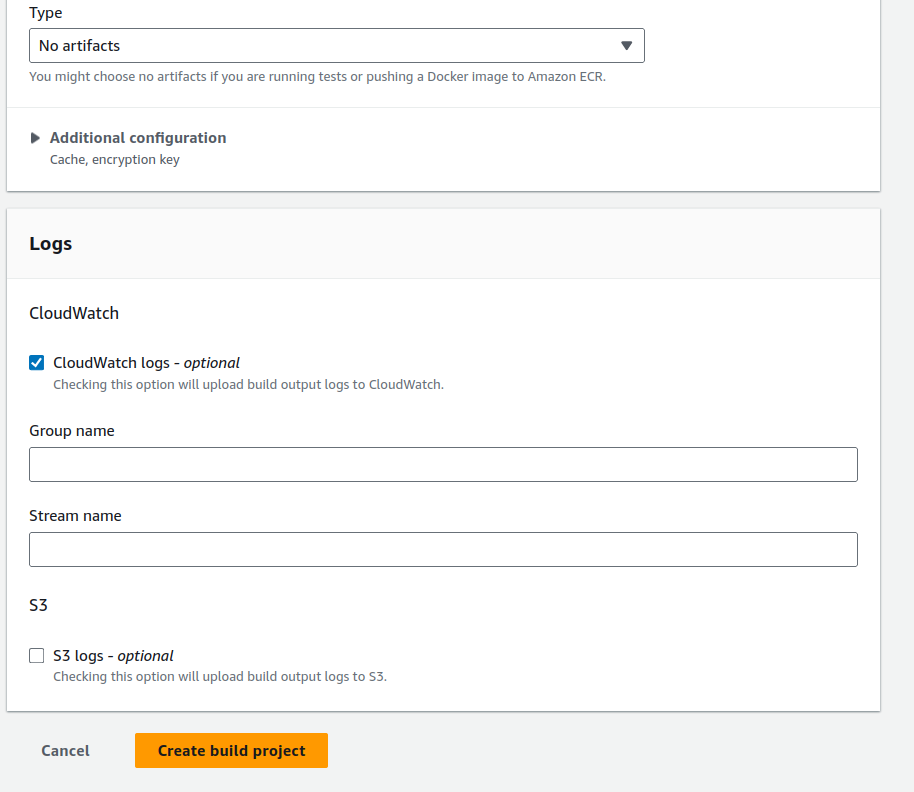
For the logging options, leave the CloudWatch option selected. If you wish to send the logs to an S3 bucket, you can, but that is optional. Once all sections are filled out, click the “Create build project” button at the bottom.
Create the code pipeline.
Now we need to create the CodePipeline. This will allow us to push any updates from GitHub to the bucket hosting the website. Since we are already in the Developer section of AWS, click on the link for CodePipeline on the left side of the screen, and you should see this screen. This is a very basic pipeline, which is all we need for this POC. However, in other POCs, we will build more advanced pipelines that contain multiple stages, allowing us to perform multiple builds in one pipeline.
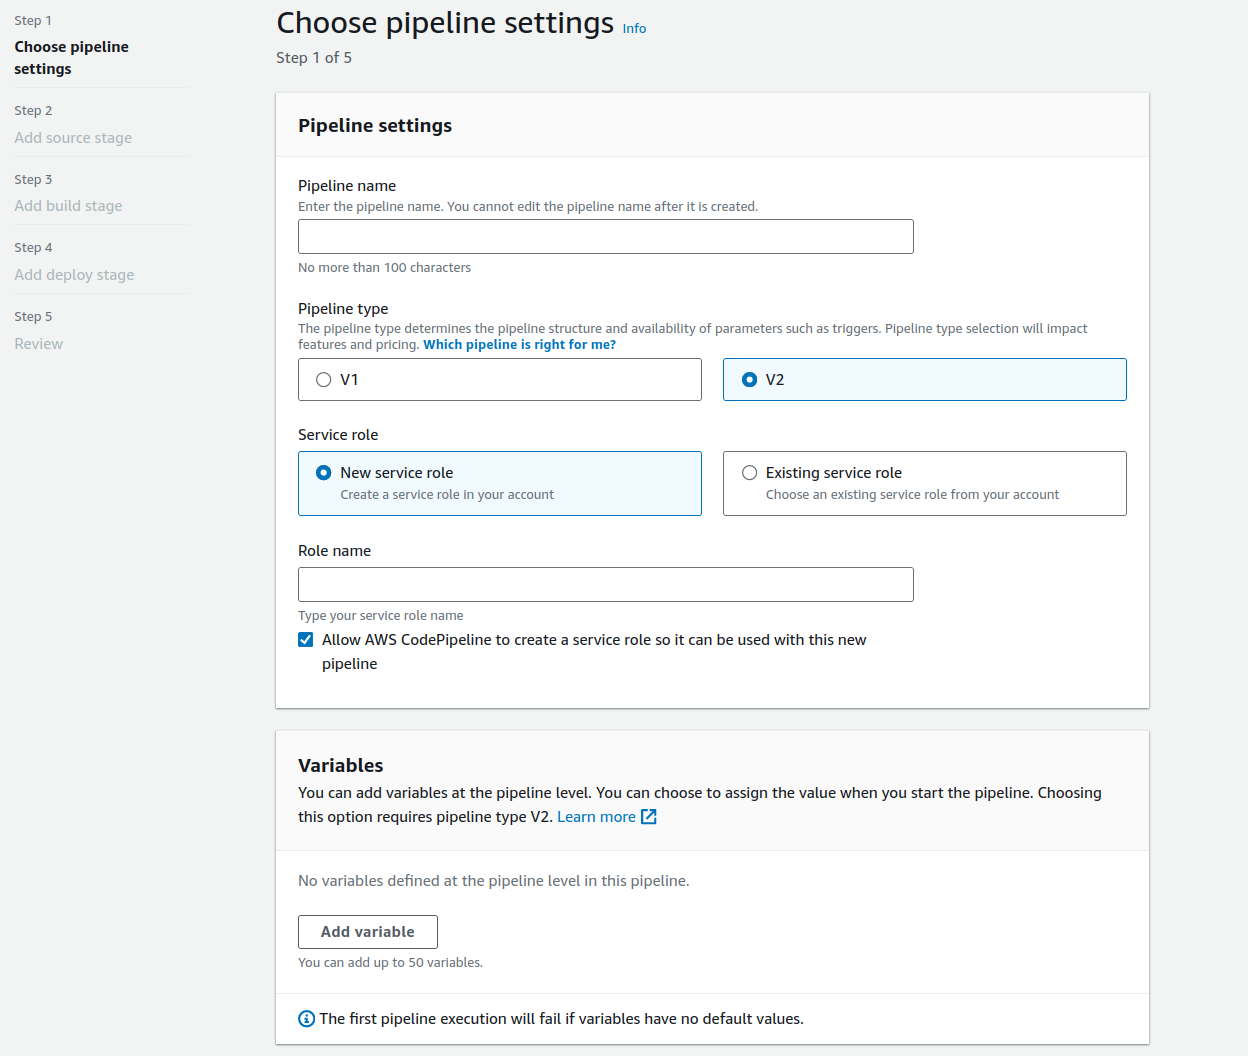
From here, all we need to do is enter a name for the pipeline, leave the rest as default, and click the “Next” button at the bottom of the page to proceed to the source stage.
When we reach the source stage screen, it will look something like this.
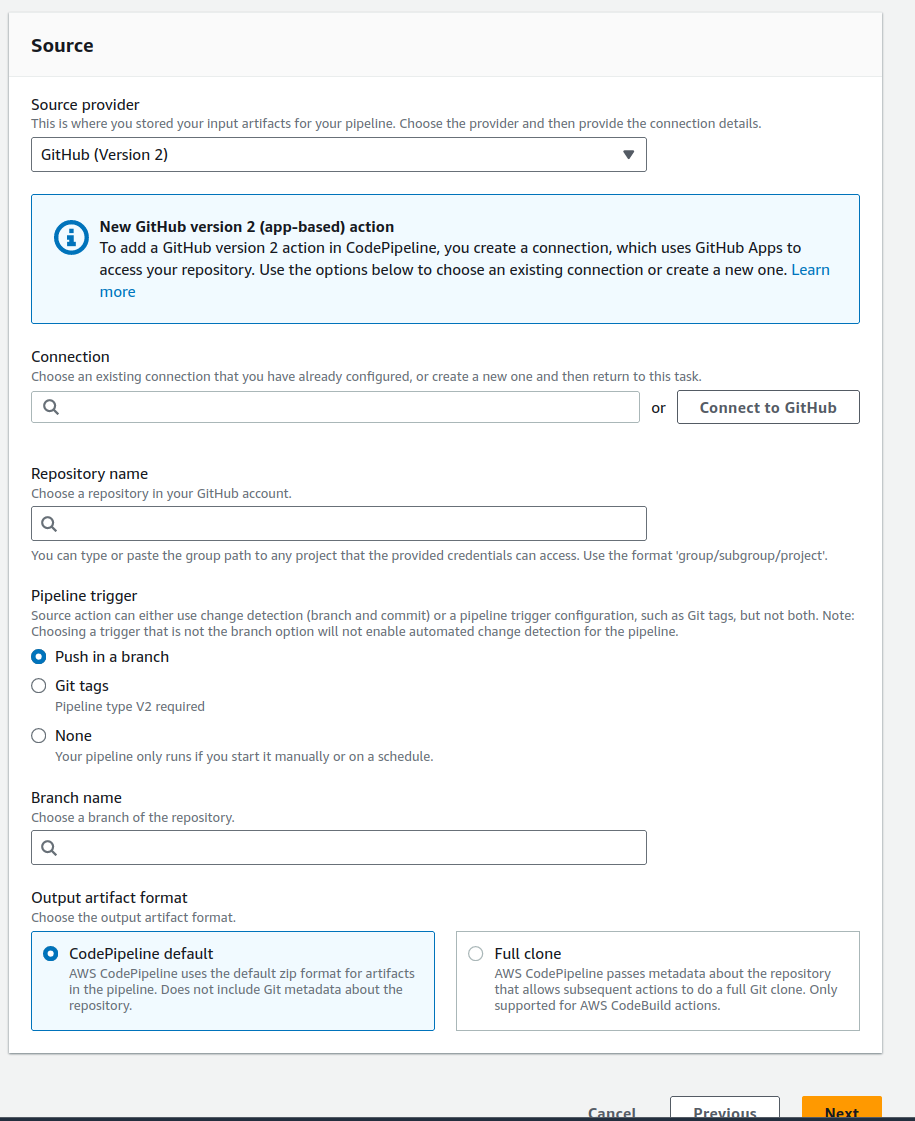
From the source provider dropdown, select the option for GitHub version 2. Next, click on the “Connect to GitHub” button if you do not already have a connection. This will open another window that looks like this.
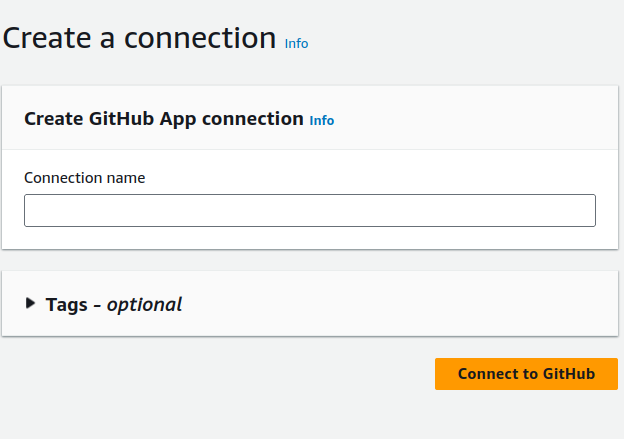
Choose a name for this connection and click on the “Connect to GitHub” button. You will then be prompted to allow the connection to GitHub, and you’ll need to sign in. Once completed, you will be returned to the previous screen, where you will see the following.
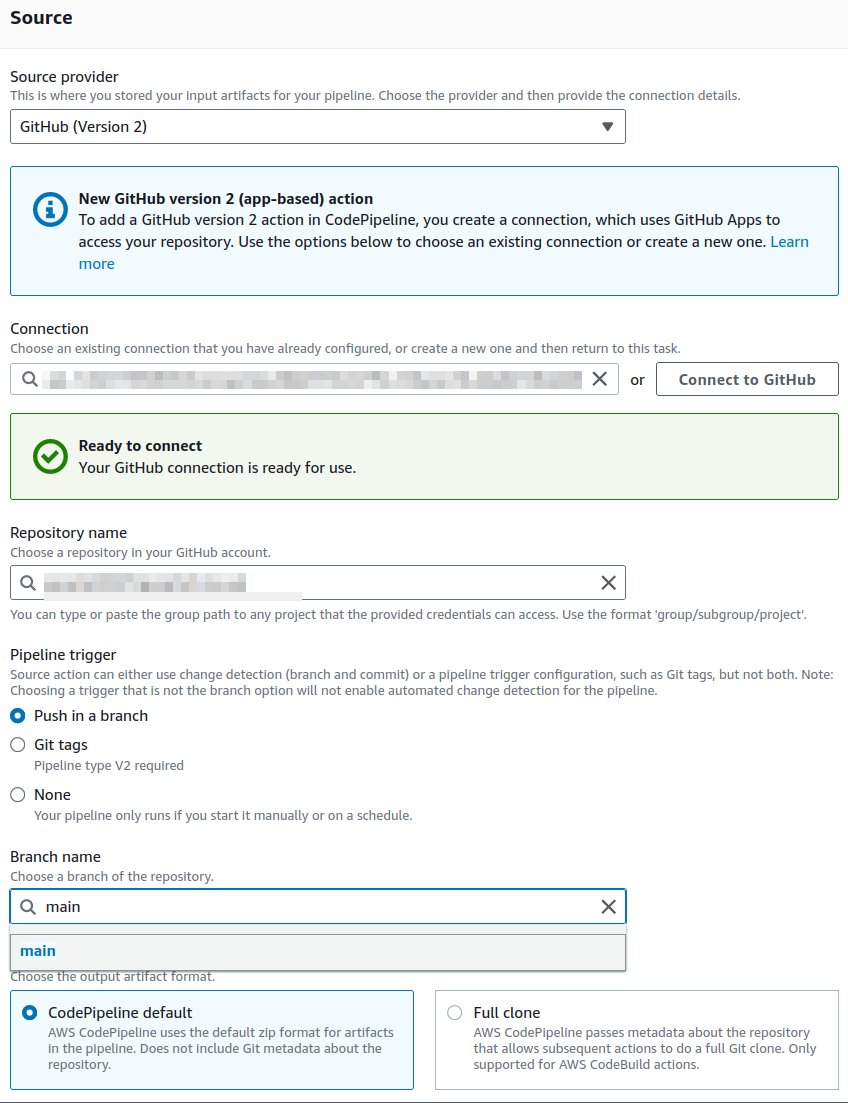
In the repository dropdown, select the name of the repository you’ve set up for your raw website data. Then, choose the branch you want to use. For the pipeline trigger, leave it set to “Push,” as this means the pipeline will trigger whenever you push new updates to your GitHub repository. Once everything is set, click “Next.”
Next, we move on to the build stage of the pipeline. This will be fairly straightforward since we have already created the build project in a previous step. All we need to do is link it. As shown in the screenshot below, there is a project search box that will display all your build projects.
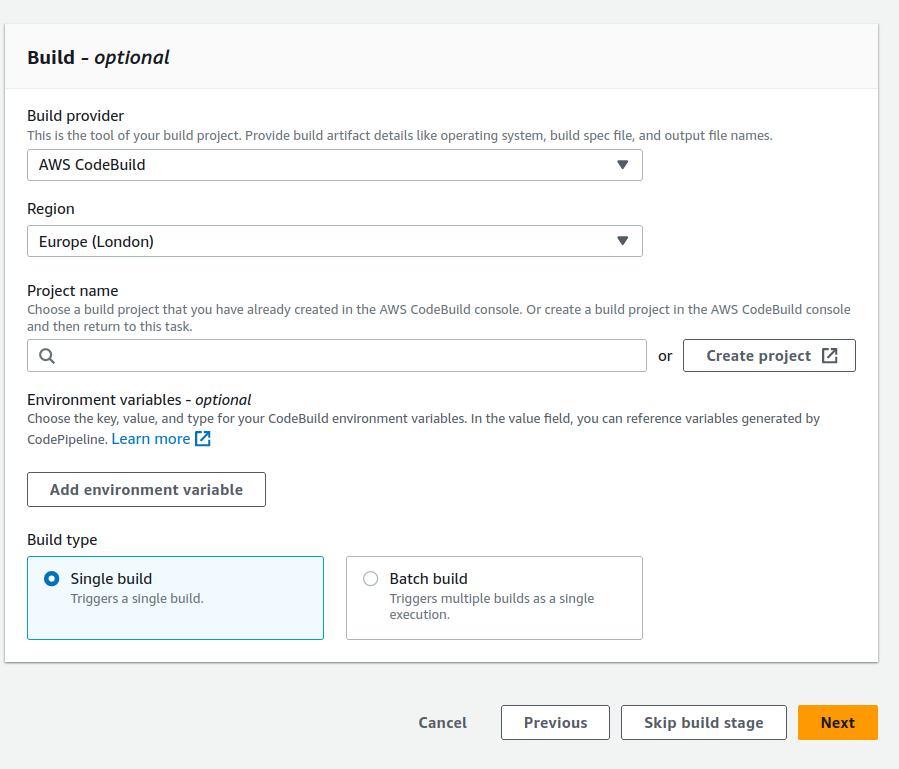
Once everything is done, we can move on to the deploy stage of the pipeline. This is also easy to configure, as it simply requires answering a few questions. Below is a screenshot of what this looks like.
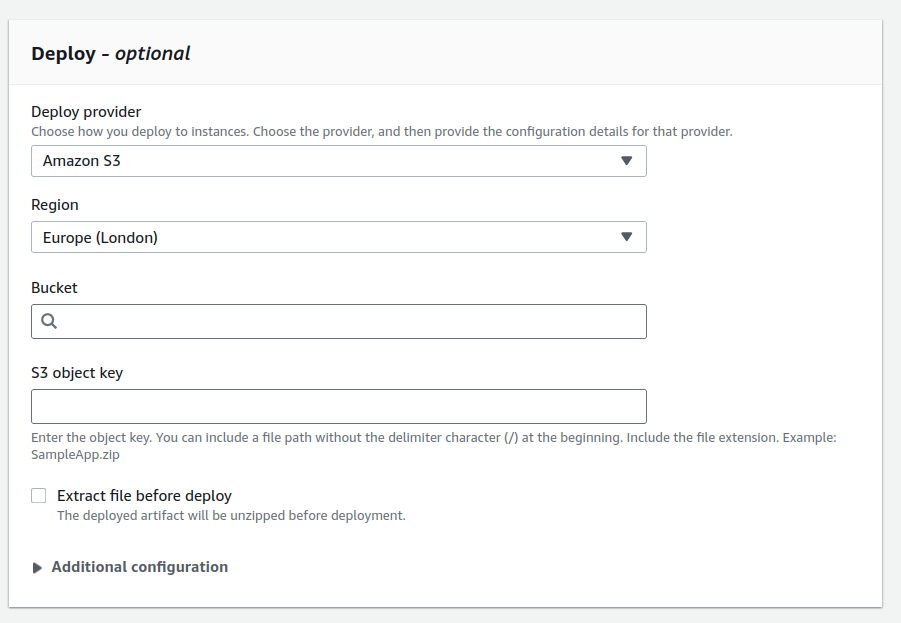
Now, all we need to do is select “S3” from the deploy provider dropdown and choose the bucket where your website will be hosted. Additionally, we need to check the box marked “Extract files before deploy.” You can leave the other configurations set to their default values. Next, simply review the settings on the following screen and click the “Create pipeline” button at the bottom. Once the pipeline is created, it will run for the first time. If everything is set up correctly, this should build your Hugo website and deploy it.
Create an ssl certificate via AWS ACM
To securely deliver your content over the internet, we will need to create an SSL certificate for the CloudFront distribution. This can be done through various methods, including using the AWS ACM service. A prerequisite for this is that you must already have a domain name registered. The process will be slightly different if you are not using Route 53 as your domain server, but it is still quite simple. It will mainly involve adding a CNAME record to your DNS server with the information provided when creating the certificate. Let’s get started.
First, go to the AWS Certificate Manager (ACM) service, and you should see a screen like this. To ensure this certificate works with CloudFront, make sure you are in US-EAST-1.

Next click on the request certificate button and this screen will appear.
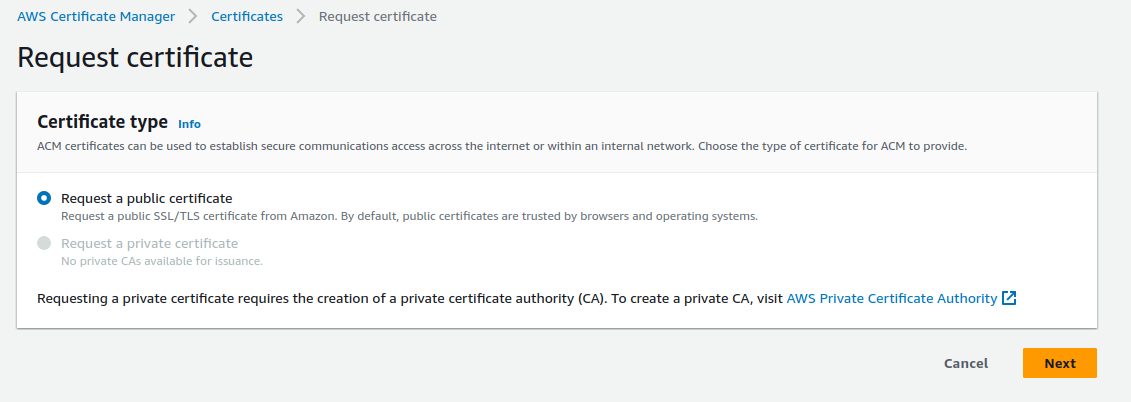
Leave the default option selected for “Request a public certificate” and click “Next.” This will take you to the next screen.
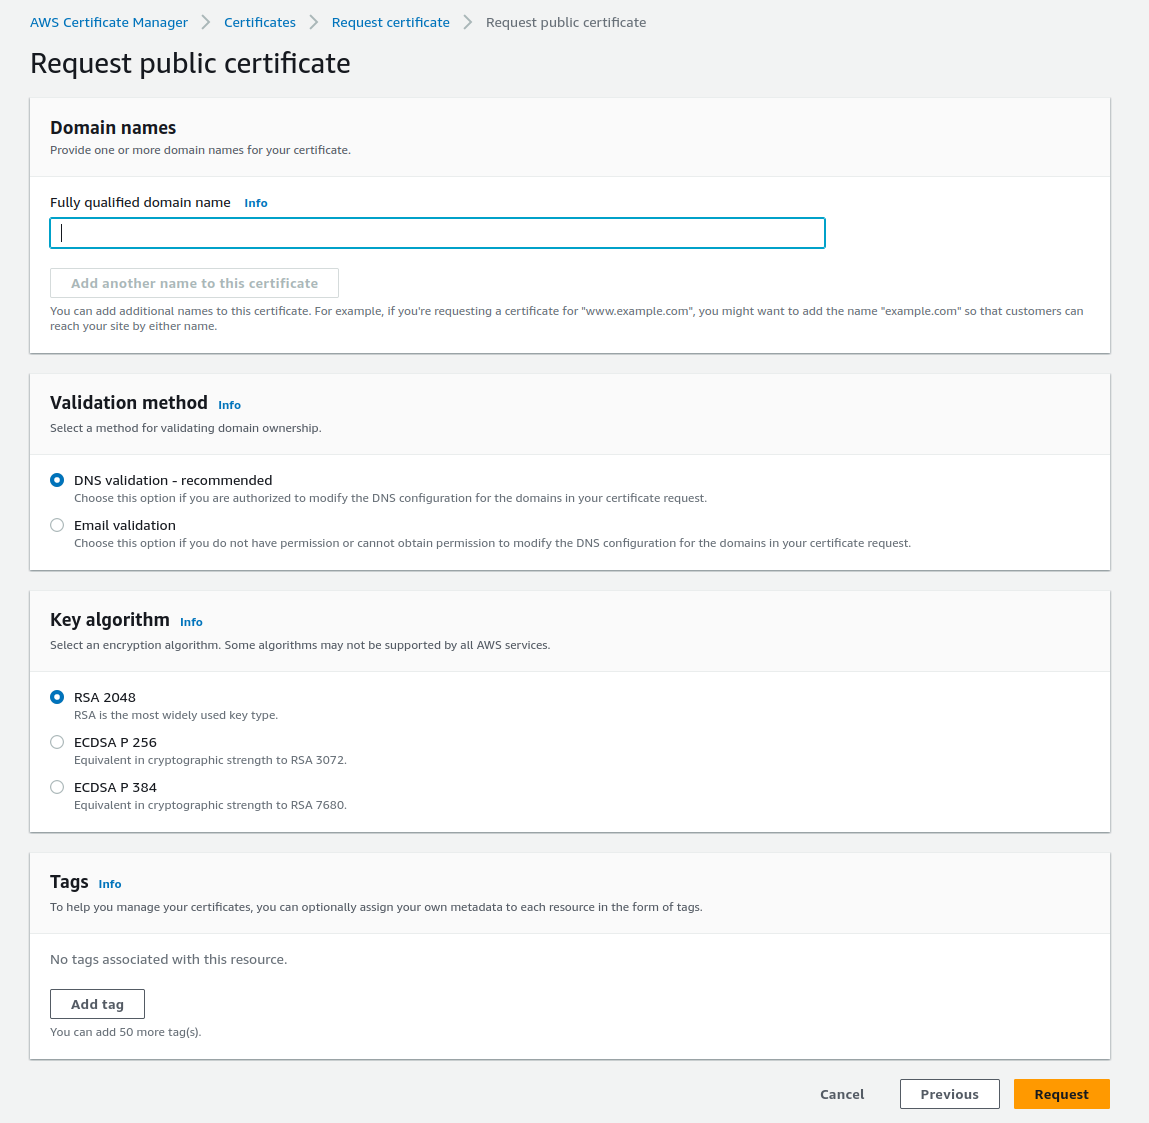
Now, all you need to do is enter the name of your domain on this screen, along with any tags you wish to add. You can leave the other options as they are. Once completed, you will be presented with this screen.

From here, you will notice that the certificate status is “Pending.” To enable the certificate, click on the certificate, and it will take you to this screen.
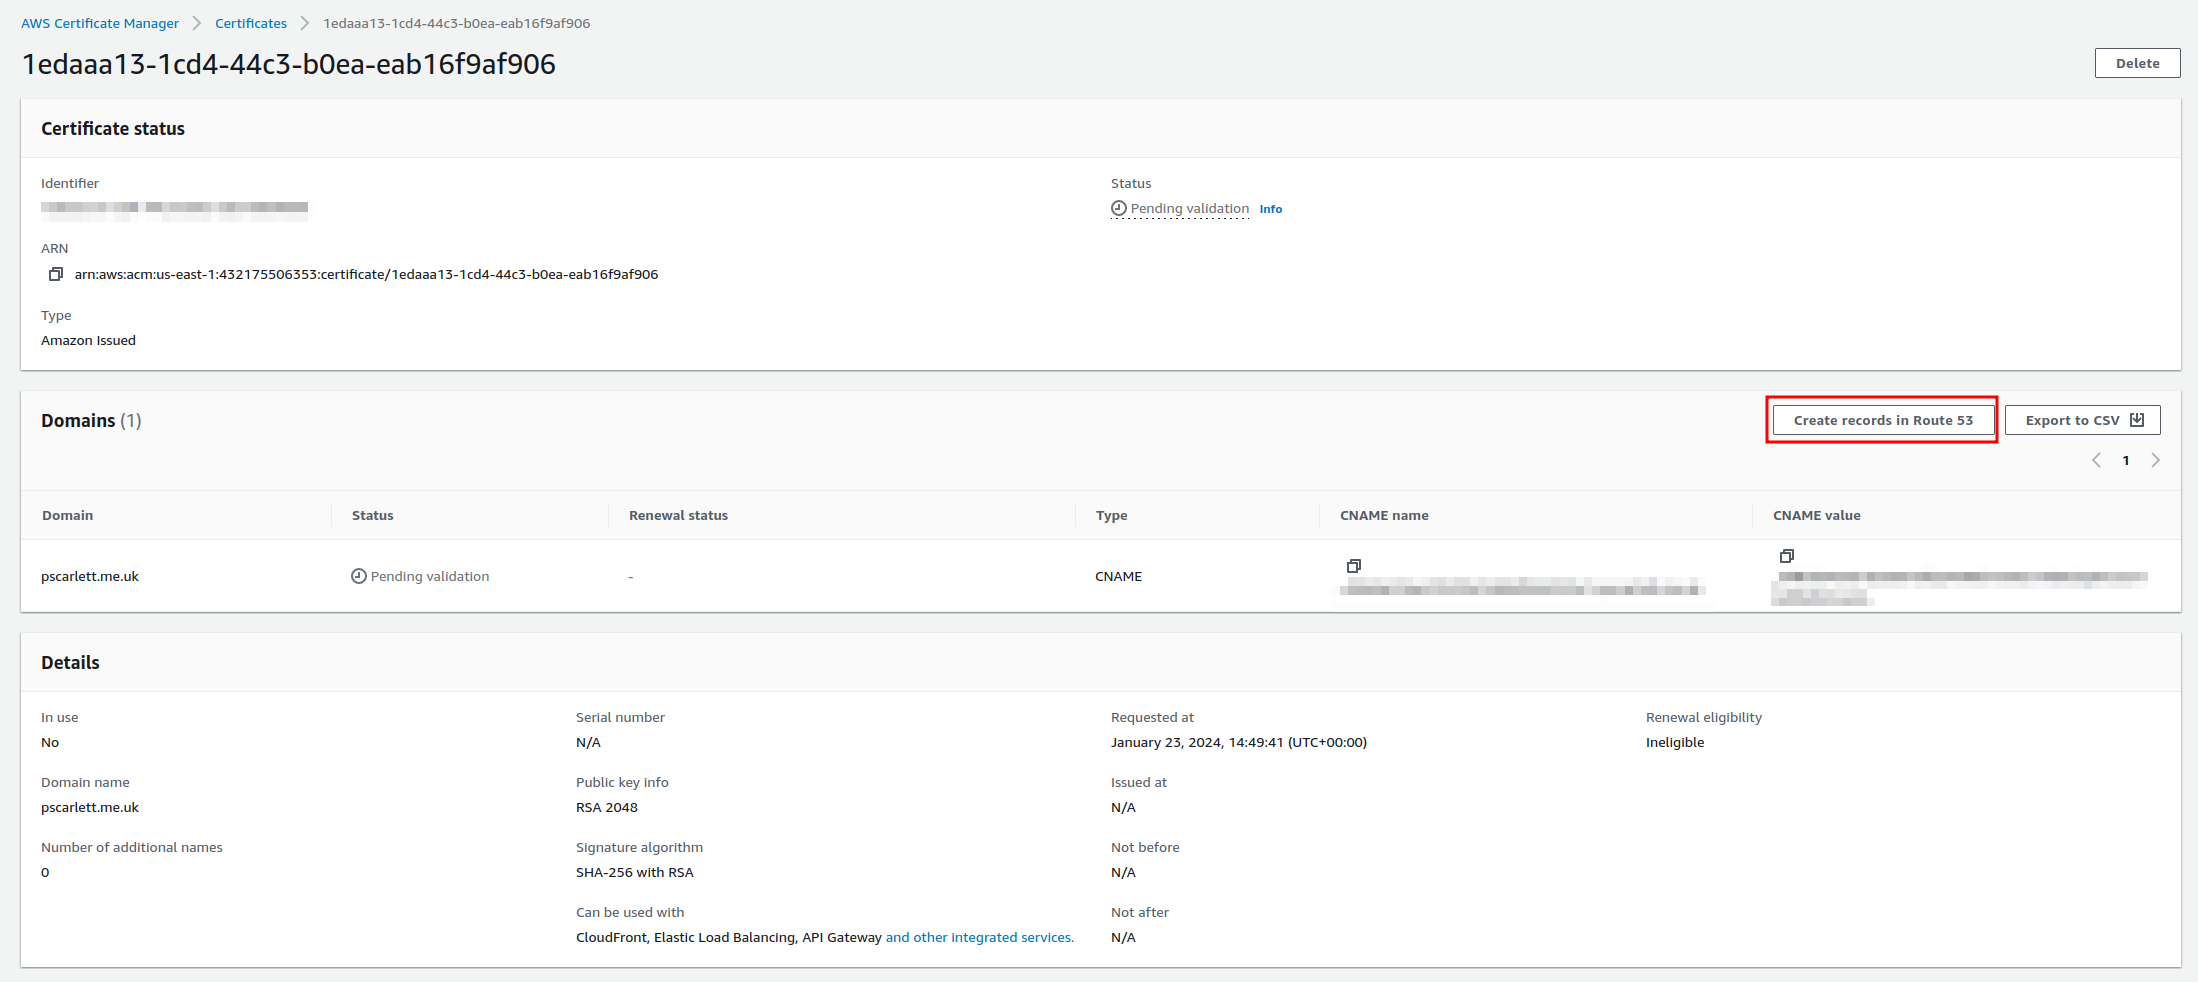
From here click on the create record in route 53 button and this screen should appear.
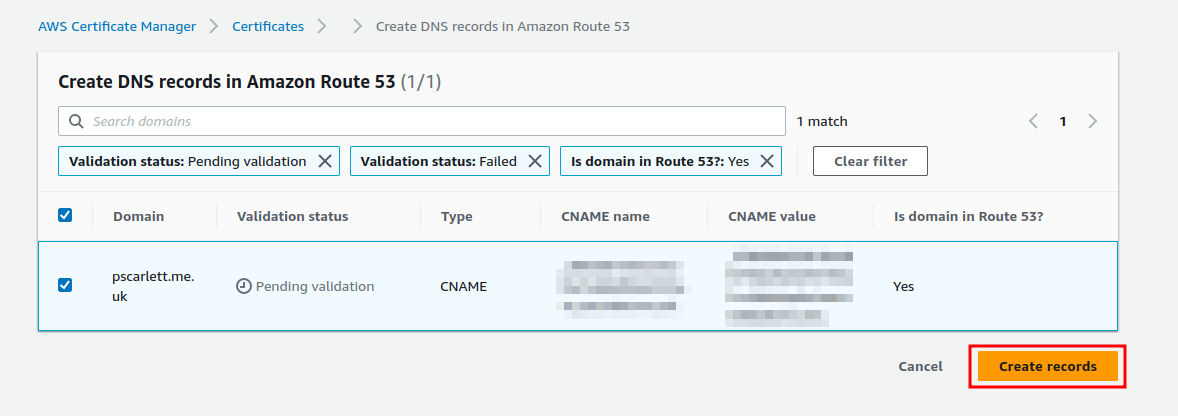
Now click on the create record button and this will then add the records into your route 53 DNS table. This can take a bit of time to show up as valid.
Now if you are not using route 53 as your domain name host. You will need to manually add the CNAME record to your DNS service. This is pretty simple to do and most hosting providers will give you information on how to do this.
Now that we have created the certificate we can move onto creating our cloud front distribution.
Create Cloud front distribution
Now we have to create our cloudfront distribution to allow us to securely connect to our S3 bucket to server our website. This is done from the cloudfront service within the console. So from your main AWS console page. In the search box type Cloud front and this will take you to the main cloud front page. From there we need to click on the create distribution page. Once you have done this, you will see the page below appear. From this page we need to start adding the information in regards to our website.
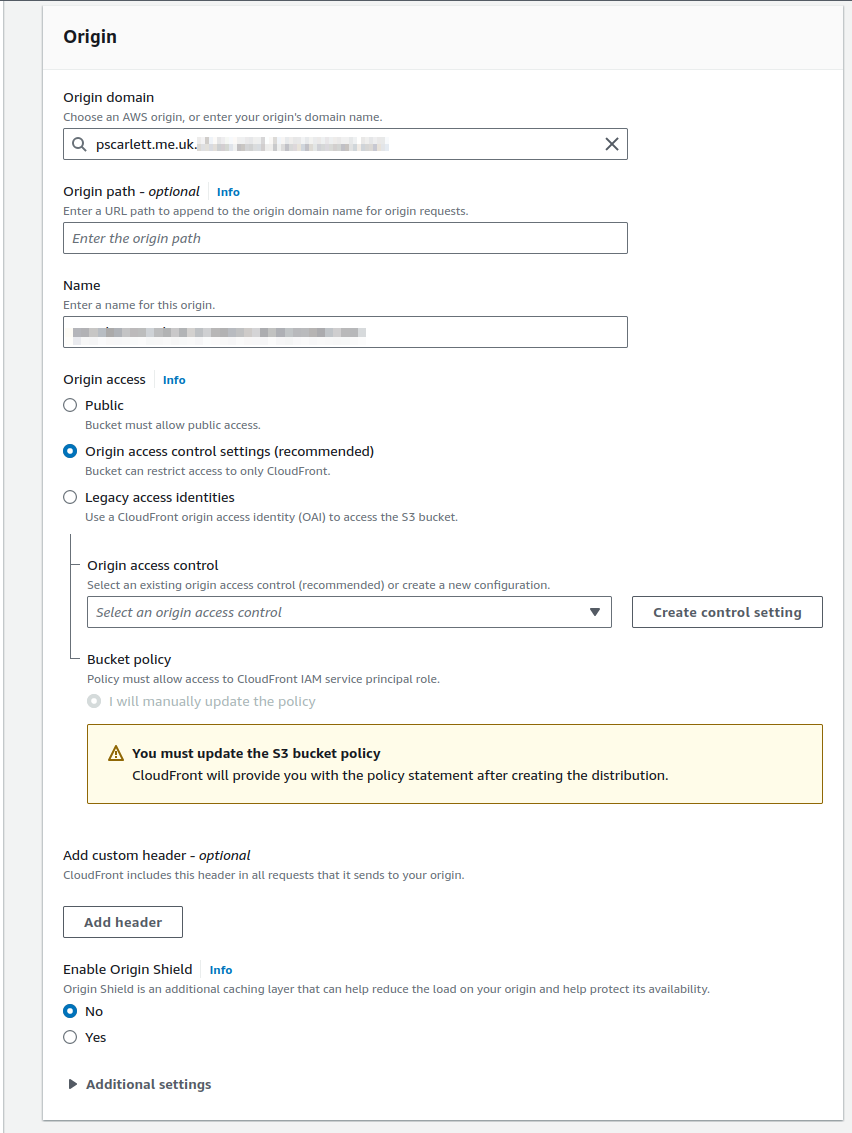
First, we need to find the origin domain for our website. Click on the “Origin Domain” box and look for the S3 bucket that contains your website. In this case, you can leave the “Origin Path” empty. However, if you have a subfolder within your bucket that contains the website, enter the folder name and add a “/” at the end.
Next, set the type of access you want to use. The best option here is to use “Origin Access Control,” as this ensures that only your CloudFront distribution can access the bucket. This is currently the recommended method for granting access to the bucket. So, click on the radio button for “Origin Access Control.” Next, we will need to either create or select an existing Origin Access Control (OAC). If you don’t have one already, click “Create new OAC.” This will prompt the appearance of the following box.
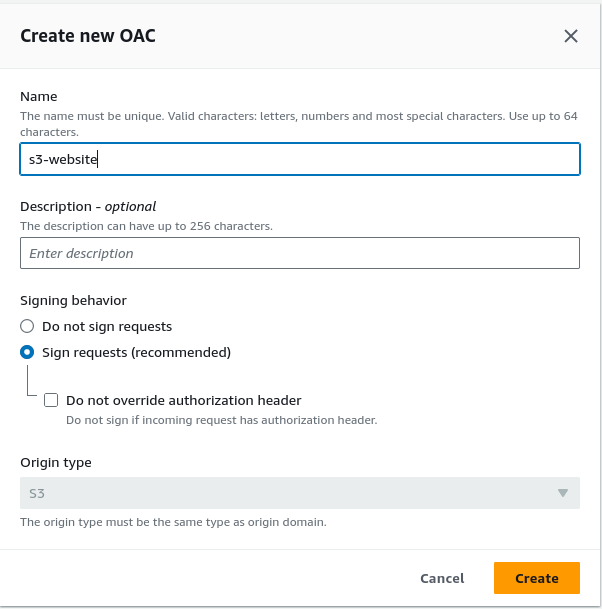
Now, enter a name for the Origin Access Control and provide a description for it. You can leave the rest of the settings as default and simply click the “Create” button.
You will receive a message indicating that, you will need to update the S3 bucket’s policy with the OAC.
Now, we need to decide if we want to enable Origin Shield. Keep in mind that enabling Origin Shield incurs additional costs. More information about the costs associated with Origin Shield can be found. here
For the additional options, these can be left as default, but they can be modified if needed. The options you can adjust include:
-
Connection attempts
-
Connection timeout
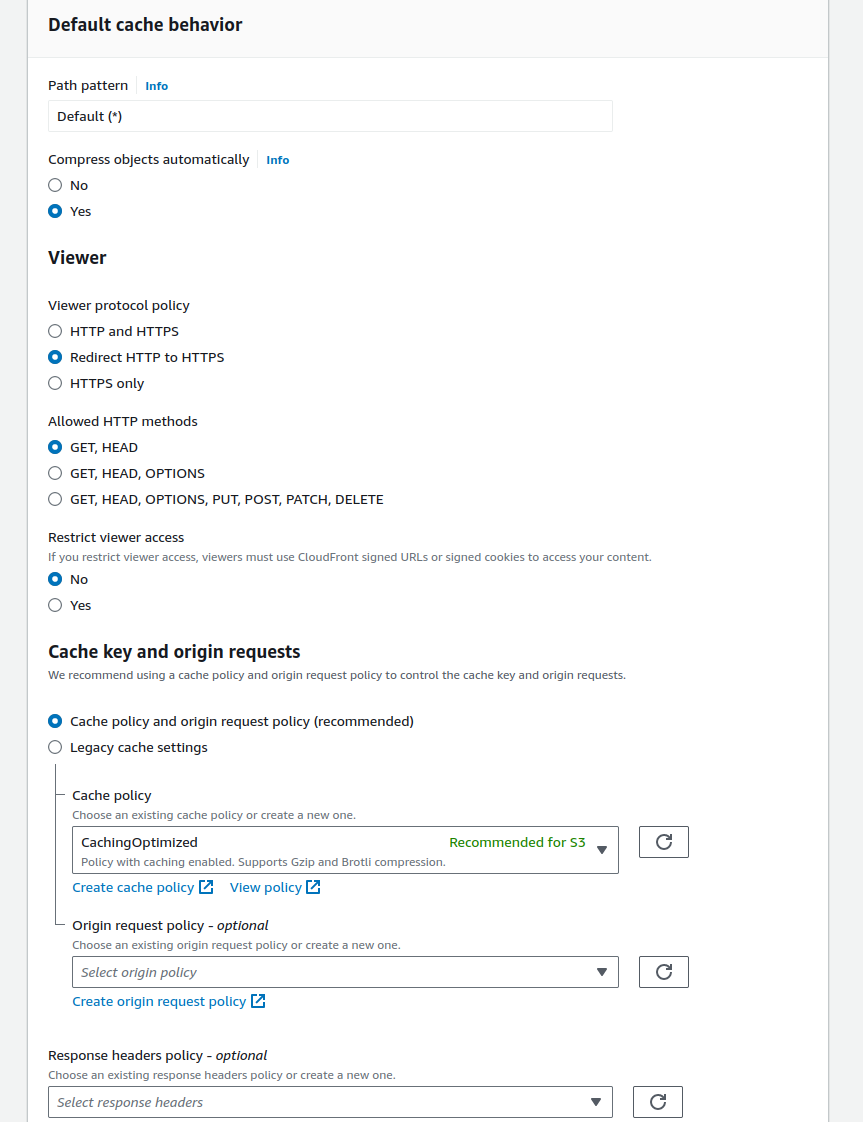
Next, we need to configure the caching behavior settings. Most of these can be left as default, but there are a few that I recommend changing. These are as follows:
- Compress objects automatically: Set to “Yes”
- Viewer Protocol Policy: Change to “HTTPS only”
- Allowed HTTP methods: Ensure it is set to “GET and HEAD”
- Restrict viewer access: Set to “Yes” if you are using signed URLs or signed cookies to access your content.
Next, for the caching policy, ensure that “Cache policy and origin request policy (recommended)” is selected, and that “CachingOptimized” is chosen in the caching policy dropdown for S3. Leave the “Response header policy” selection blank unless you require Cross-Origin Resource Sharing (CORS) for your website.
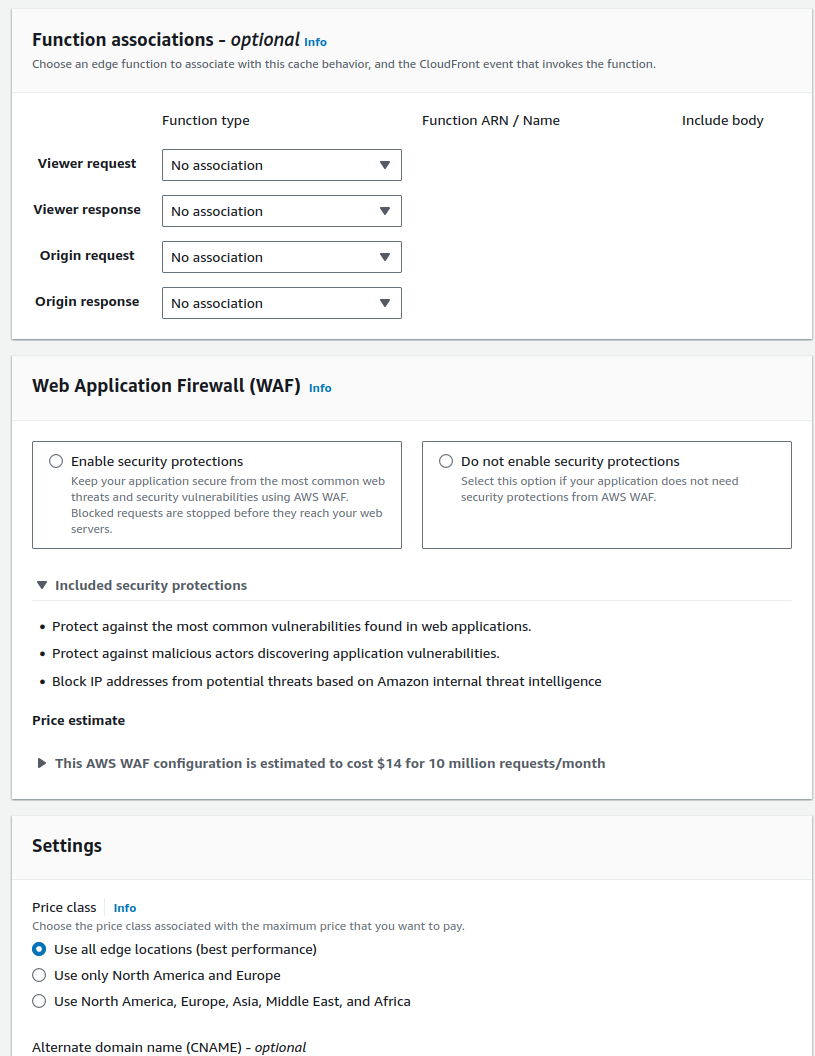
For the function associations, leave these as default. Now, regarding the WAF (Web Application Firewall) settings, this depends on your specific use case. In my case, the built-in security features of CloudFront are sufficient. However, if you require more advanced security, such as blocking certain geographic locations or restricting access to specific IP addresses, these can be configured through the WAF settings.
Keep in mind that using WAF will incur additional costs, and depending on the number of rules you implement, these costs can add up quickly. However, if your website will be used for business purposes and requires extra security, WAF is the best option.
Next, we need to choose the edge locations where you want your site to be cached. The more edge locations you select, the higher the costs of hosting your website. The decision will depend on whether you want optimal performance from CloudFront across all regions or just in the primary regions where you expect the most traffic.
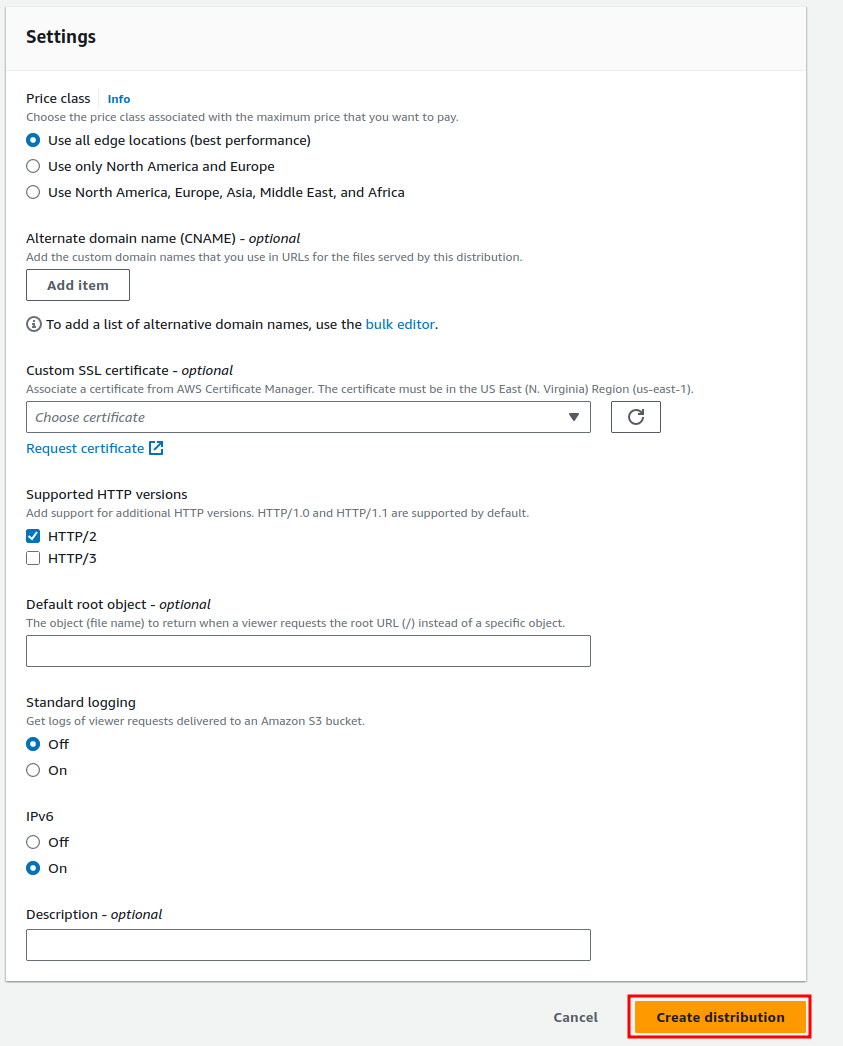
We are almost finished. The final step is to ensure that your CloudFront distribution can be accessed via your domain name. First, we need to add the Alternate Domain Name (CNAME) for the site. This should be the domain you own, whether it’s through Amazon or another hosting provider, and it was used when creating the SSL certificate within ACM. Once you’ve entered your domain, we need to add the custom SSL certificate we created earlier. Simply select it from the drop-down menu.
Next, check both boxes for supported HTTP versions. For the default root object, enter the name of your default file, typically index.html. Then, enable standard logging and ensure that IPv6 is turned on.
After completing all the settings, click the “Create Distribution” button. You will then be redirected to the distribution page.
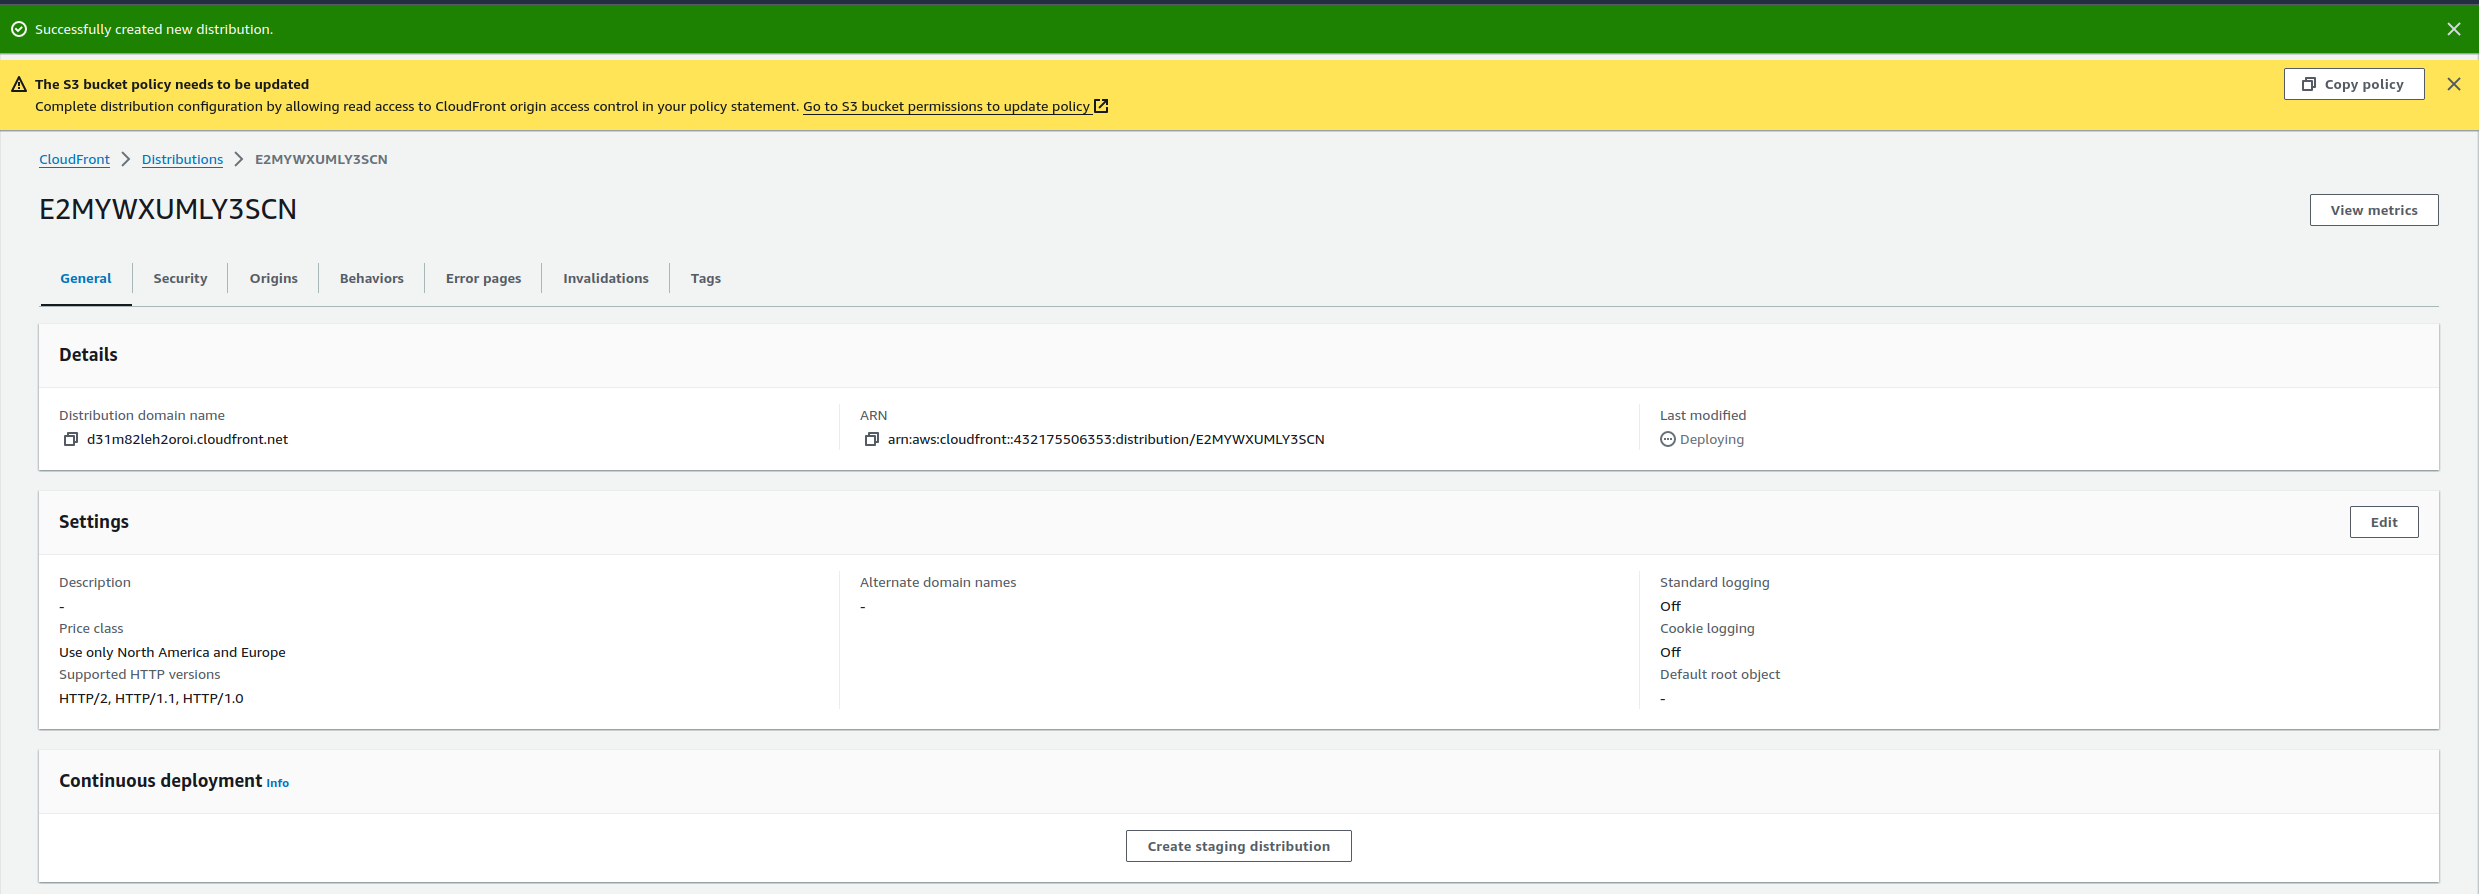
At the top, you will see a yellow box notifying you about updating your S3 bucket policy. This is because we created an Origin Access Control (OAC) policy. You will need to add this policy to your S3 bucket’s policy to allow the CloudFront distribution to access it. The policy will look something like this:
{
    "Version": "2008-10-17",
    "Id": "PolicyForCloudFrontPrivateContent",
    "Statement": [
        {
            "Sid": "AllowCloudFrontServicePrincipal",
            "Effect": "Allow",
            "Principal": {
                "Service": "cloudfront.amazonaws.com"
            },
            "Action": "s3:GetObject",
            "Resource": "arn:aws:s3:::pscarlett.me.uk/*",
            "Condition": {
                "StringEquals": {
                    "AWS:SourceArn": "arn:aws:cloudfront::<account id>:distribution/<distibution id>"
                }
            }
        }
    ]
}
All you need to do is copy this policy into your bucket’s policy. Additionally, we need to make one more change in Route 53 or within your DNS server: create an alias to point your domain to the CloudFront distribution. This can be done by going to Route 53 and following these steps. Navigate to “Hosted Zones” and select your domain name. Then, click on “Create Record,” and you should see this screen appear.
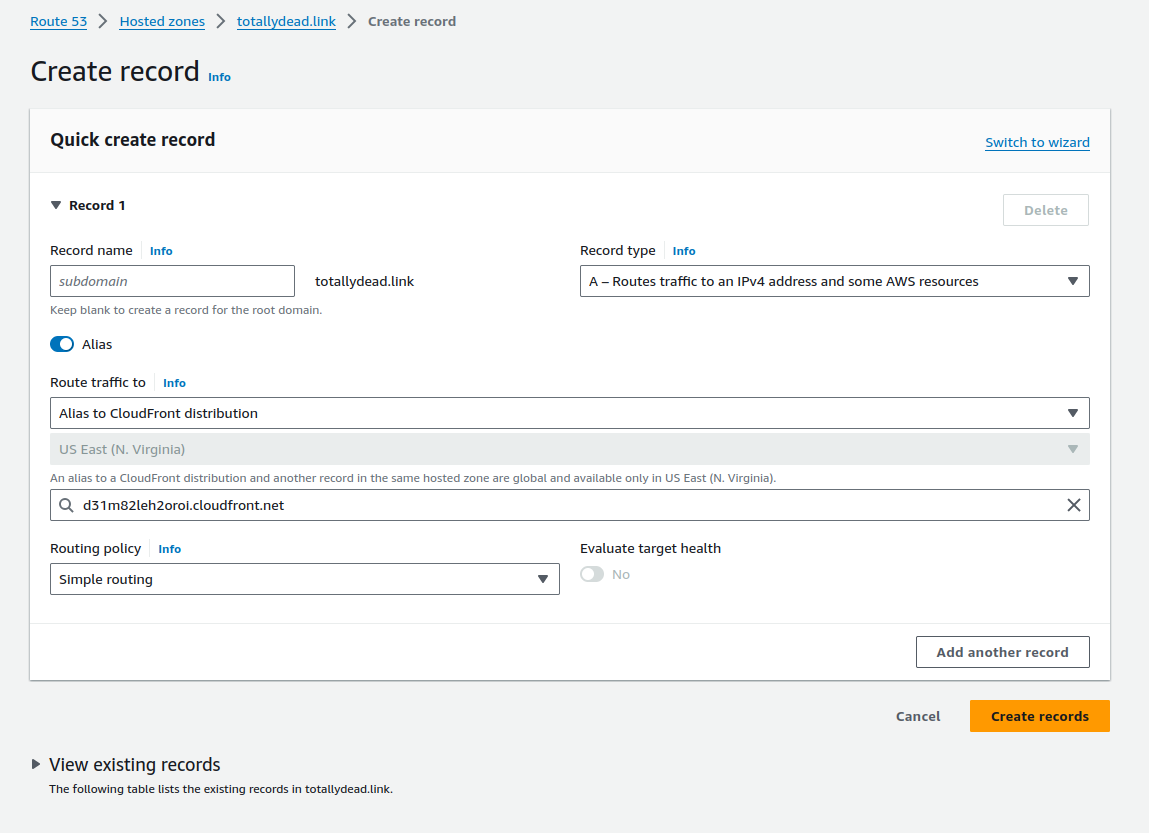
From here, leave the subdomain box empty unless you are creating a subdomain. Then, click on the “Alias” button. From the “Choose endpoint” drop-down box, select “Alias to CloudFront distribution.” In the next box, choose your CloudFront distribution.
If you are using another DNS provider, the process for creating the alias might differ, but your provider should have instructions on how to do it.
Once completed, this should allow your CloudFront distribution to access your S3 bucket using your domain name. Please note that it may take up to 5 minutes for you to access your website via its domain name. This is due to how DNS works, and the information you added to your DNS will need to propagate across DNS servers around the world. If it doesn’t appear right away, wait 5 minutes and try again to access your site via the domain name.
Summary
Here is a summary of the steps we’ve taken to set up and deploy a static website using AWS services:
-
Created an S3 Bucket for Web Hosting:
- We set up an S3 bucket to host the static content of our website, ensuring that all configurations, such as permissions and versioning, were correctly configured for web hosting.
-
Set Up an SNS Topic for Notifications:
- We created an SNS (Simple Notification Service) topic to notify the developer via email if the pipeline fails during deployment.
-
Created a CodeBuild Project:
- We configured a CodeBuild project that specifies how to build the website content. We then linked it to the GitHub repository and set up the build process to automatically run when changes are made.
-
Created a CodePipeline for Continuous Deployment:
- We set up a simple CodePipeline that integrates with GitHub, CodeBuild, and S3. The pipeline automatically triggers when changes are pushed to the GitHub repository, builds the website, and deploys it to the S3 bucket.
-
Created an SSL Certificate with AWS ACM:
- We used AWS Certificate Manager (ACM) to create an SSL certificate for securing the website with HTTPS. This required us to verify domain ownership and ensure that the certificate was created in the US-EAST-1 region for use with CloudFront.
-
Created a CloudFront Distribution:
- We set up a CloudFront distribution to securely deliver the content from our S3 bucket to the users. This involved configuring the distribution settings, such as the SSL certificate, caching behaviors, and security policies.
-
Updated S3 Bucket Policy:
- We updated the S3 bucket policy to allow CloudFront to access the content, using an Origin Access Control (OAC) policy to restrict direct access to the bucket.
-
Created DNS Records for Domain Name:
- We configured Route 53 (or another DNS provider) to create an alias record pointing to the CloudFront distribution. This ensures that users can access the website using a custom domain name.
-
Final Testing:
- Once all configurations were complete, we deployed the website and verified that it could be accessed securely over HTTPS via the domain name. DNS propagation may take up to 5 minutes for the changes to take effect. This process enabled us to automate the deployment of our static website with continuous integration and delivery (CI/CD) through AWS, ensuring that new content can be easily pushed to the website and served securely to users worldwide.